Mixed License Plate Receiving Via WMS app at Warehouse or at Store

Hello guy’s, this blog is all about a new feature – Mixed LP receiving that is a combination of the LP receiving and Purchase order receiving.

S3 – WMS APP Main Screen

Coming straight to the business process – lets say there is a business requirement stating that 10 or more PO’s have been raised from a distribution center of a company, WH/store users want to do a receiving based on LP but PO number must also be scanned.

The below configuration and process must be followed

Lets start with the configuration – In the mobile device menu item, there is a new work creation process – Mixed License plate receiving

S1 – Mobile Device Menu Item

As per the above screen shot S1, source document line identification (in this case – Purchase order item receiving) is required with a work template (if you have different pick-put activity) or you can select the standard purchase order work template.

Created Mixed LP receive mobile device menu item must be added in the mobile device menu form, so that we can use the WMS app for receiving PO with LP.

Create a purchase order and lets do the Mixed LP receiving using WMS app.

S2 – Purchase order

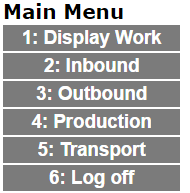
Lets login in new WMS app and click on inbound

S3 – WMS APP Main Screen

Click on Inbound and lets see the Mixed LP Receiving Menu

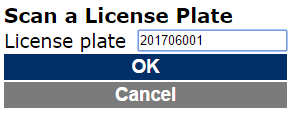
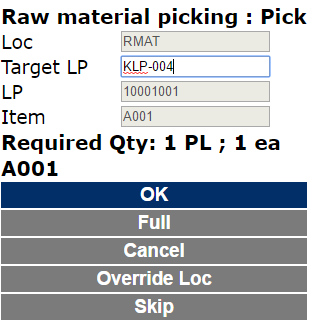
Click on Mixed LP Receive button and provide the LP

After entering or scanning LP, WMS app keeps the LP number, if LP number is already in use, it will not except.

Enter or scan the PO number or barcode,

After the scanning/entering PO number, scan the Item barcode

Enter the qty and scroll the toggle to right (correct button :))

Lets say the there is another item for another Purchase order number, user can click on the toggle, the following functionalities will be available (screen shot below)

  1. Change the PO number
    1. To receive the item for another PO
  2. Show list
    1. It will show the scanned item list in LP
  3. LP complete
    1. Thats means LP is full and new LP is required to receive the items

Let’s say LP is complete, once you select LP complete, the option to modify will be available when toggle is swipe left.

Modify is an optional activity, not a mandatory one, if a user wants to correct a qty, the user can make use of this functionality and can take action and complete the activity of receiving via LP & PO ๐Ÿ™‚

If its a store or a warehouse and they want put-away work for purchase to be completed automatically, it can be achieved by using work policies, but the required feature must be enabled. Or else, standard put-away will be created to complete work ๐Ÿ™‚

Happy Reading ๐Ÿ™‚

Cycle counting using warehouse management in Dynamics 365, Enterprise

Hello consultants! Today, Iโ€™ll be blogging about cycle counting process in dynamics 365 or say D365. Cycle counting is a warehouse process, in which warehouse worker do counting of items irrespective of perishable/non-perishable items on basis of location or items.

Letโ€™s take a scenario, warehouse planner to have a cycle count for a location say A1R1S01B01 and if there is any discrepancies, system should automatically adjust difference in quantities and post a inventory adjustment journal. Warehouse planner creates manual cycle count work. The warehouse supervisor/worker login using app and select cycle count guided operation and complete cycle count work

The following pre-requisites required for creating and completing cycle counting work:

  • Cycle count thresholds
    • Cycle count work in D365 created based on the threshold parameters. Cycle count work can be created manually or automatically (using batch process)
  • Mobile device
    • Cycle count โ€“ System directed

Letโ€™s configure cycle counting based on location in D365;

Step I: Go to warehouse management โ€“ Setup โ€“ Cycle counting โ€“ Cycle counting threshold

  • Click on new
  • Enter name and description
  • Select threshold type as percentage and enter percentage as 10%
  • Select work pool id โ€“ cycle count

1

  • Click on โ€œselect locationsโ€ button. Query form will be displayed, select warehouse and location

2

  • Click ok. Click on save and close the form

Step II: Go to warehouse management โ€“ Setup โ€“ Cycle counting โ€“ Cycle counting plan

  • Click on new
  • Enter cycle counting plan id, description and, maximum number of cycle counts (say 1)

3.png

  • Click on โ€œselect locationsโ€ button. Query form will be displayed, select warehouse and location

4

  • Click ok and save
  • Click on process cycle counting plan. A form will be displayed and click ok
  • An information message will be displayed as shown below in screen;

5.png

Step III: Go to warehouse management โ€“ Setup โ€“ mobile device โ€“ mobile device menu item

  • Click on new
  • Enter menu item name and title
  • Select mode โ€“ Work
  • Select YES to use existing work
  • Select directed by โ€“ system directed

6.png


Mapped Business Scenario;

As per the scenario, warehouse planner creates cycle count work manually for a location and inform the cycle count supervisor to count items for a location. As per step II, created cycle count work;

Go to warehouse management โ€“ common โ€“ cycle counting โ€“ open cycle counting work

7.png

  • Warehouse supervisor login via native app

8.png

  • Warehouse supervisor click on inventory

9

  • Warehouse supervisor click on cycle count guided

10

  • After clicking cycle count guided. The screen will display information as shown in below screen

11

  • Warehouse supervisor will verify the pallet and enter counted quantity. Supervisor will click on quantity

12

  • Enter 45. Click on correct mark. An information message will be displayed (means there is discrepancies in quantity)

13.png

  • Supervisor again count and enter same quantity as 45

14

  • Warehouse supervisor, click on correct mark

15

Once work is completed. Supervisor log out from mobile app and inform warehouse planner. Warehouse planner go to closed cycle counting work in D365 to check status of work, discrepancies adjusted (if any) and whether journal is posted or not.

16

Warehouse planner click on work action tab and click on cycle counting button.

17.png

As you can see in above screen, counted quantity has been captured in D365 and automatically a journal is posted


Replenishment of Fixed location using warehouse management

Hello folks, today Iโ€™ll be demonstrating one of the feature of advanced warehouse management that use to replenish the fast moving (fixed) locations using one of the standard replenishment engine i.e. min-max replenishment. This engine will explain how a complete pallet will be moved from one location to another fixed or fast moving location

This document will explain the pre-requisites required for replenishment and a cycle till creating work in AX. The standard demo data is used like item – B001, Site/Warehouse โ€“ 2/24

Letโ€™s take a scenario, suppose there are seven locations in different levels in one aisle in one warehouse.

Following table explain the locations having pallets with quantity say 100 ea. and, the fixed locations say locat-02/03 having no pallets no quantities and these fixed locations will be replenish from the higher levels say locat-07/06/05/04 if they are having pallet with quantities; as demonstrated in below table


Locations Location profile License plate Quantity Replenish Locations Unit
Locat-01 Bulk-06 Pallet-08 100 Yes Ea.
Locat-02 Bulk-06 No pallet No quantity Yes Ea.
Locat-03 Bulk-06 No pallet No quantity Yes Ea.
Locat-04 Bulk-06 No pallet No quantity No Ea.
Locat-05 Bulk-06 Pallet -05 100 No Ea.
Locat-06 Bulk-06 No pallet No quantity No Ea.
Locat-07 Bulk-06 Pallet -07 100 No Ea.

As per the table shown above, there are 3 fixed locations having no pallet no quantity, and 5 normal locations in which 3 locations having pallets and quantities of 100 ea. and 2 locations with no pallet and quantities.

Following are the pre-requisites required for replenishment:

  1. Work Template: In the work template, following steps will be required to create work:
    • Select work order type – replenishment
    • Click on new
    • Enter work template code, description
    • Under the newly created header and create the pick and put work with work class as replenish

Note: Click on edit query button for created work template and click on add lines and select field as warehouse and in criteria select the warehouse code/name from lookup

  1. Location directives: In the location directives form, following actions are required to create the pick actions from locations:
    • Select work order type – replenishment
    • Location directives fast tab:
      • Click on new
      • Enter name, work type, site and, warehouse
      • Click on edit query button; select the type of replenishment as โ€œMin-max replenishmentโ€
  2. Lines fast tab:
    • Click on new
    • Enter the โ€œFrom and Toโ€ quantity
  3. Location directives actions fast tab:
    • Click on new
    • Select fixed and non-fixed location under location usage field
    • Click on edit query. A new dialog box will be displayed.
      • Under range fast tab:
        • Select the item as โ€“ Enter the item number say โ€œB001โ€ Amul butter
        • Under line table-location, select field โ€“ location profile
      • Under sorting fast tab:
        • Click on add button, select field as โ€œlocationโ€ and search direction as descending
  4. Fixed Locations: In the fixed location form, following steps will be conducted:
    • Click on new
    • Select the items :โ€“ B001
    • Select site and warehouse:โ€“ 2 & 24
    • Select the location :โ€“ Locat-01
    • Repeat this step 2 more times with location as Locat-02, Locat-03
  5. Replenishment template: In replenishment template form, following steps will be required:
    • Click on new
    • Under replenishment template details:
      • Click on new
      • Enter the Replenishment template
      • Enter Description
      • Select replenishment template as Min-max replenishment
    • Under replenishment template lines:
      • Click on new
      • Enter Description
      • Enter minimum quantity – 10 ea. and maximum quantity – 100 ea.
      • Select demand increment โ€“ Round up
      • Select the check box for the following:
        • Evaluate empty fixed location
        • Replenish fixed location
        • Click on select product button. A new form will open and select the items say โ€œB001โ€ and close the form

As per the scenario, we are going to run the min-max replenishment engine and as per the setup, AX will create the work. A dialog box will be displayed as shown below with following information

8.1

Go to open replenishment work form under common, work will be created in AX as shown below:

  1. Work 1

8.2

As shown in above screen, locat-02 is replenish from locat-07.

As per the setup, in mobile portal/WMDP, picker will login in WMDP device and main menu will be displayed

8.3

Picker will click on display work and filter by replenishment

8.4.png

Picker will select the work id โ€œUSMF-000548โ€ and below screen will be displayed.

8.5.png

Picker will scan the pallet and click ok. System suggested location will be displayed as shown in below screen

8.6

Picker will click ok. And work is completed.

Note: Similarly other created replenishment work, will be completed as shown and explained above

Warehouse planner, will login in AX and check replenishment work is closed or not. Planner will go to closed replenishment work under common in warehouse management module


CROSS DOCKING PROCESS USING ADVANCED WAREHOUSE MANAGEMENT AX 2012 R3

Hello Folks, Warehouse Management in AX is bit interesting in exploring and challenging at the same time to explore and configure. This blog will walk through the cross docking process using advanced warehouse management features

Receiving Process for cross dock purchase order using HHT

Keeping in mind, the business scenario, the purchase order will be created by buyer in AX and it will be confirmed

1

Once the commercial invoice received from the vendor, the load will be created by the transportation coordinator

2

User will click on To new load and will create the load.

3

As per the commercial invoice, warehouse planner will create the ASN template and upload in the system

4


Warehouse admin will follow the navigation in HHT/WMDP:ย Login in HHT

1.1

Click on inbound in main menu

1.2

Click on LP receiving

1.3

Enter the consignment number and,

1.4

Click ok and below screen will display subsequently

1.5.png

1.6

Open work will be created in AX as per the ASN

1.7

Again user will login into HHT by following the navigation: Login in HHT

1.1

click on display work in main menu and filter work by purchase order and,

2.1

select the work id and click ok

2.2.png

Pallet is getting picked from Receiving area. Once the picker click ok. Pallet will be picked and below screen will display

2.3

Now the pallet has been ready to put to Qc Area 1 and User will ok and display work will display and again filter the work

2.4

Select the work id and click ok.

2.5

Pallet is getting picked from QC Area 1. Once the picker click ok. Pallet will be picked and below screen will display the put location

2.6

Closed work in AX as per the ASN/Consignment receiving put-away using HHT device

2.7

Continue with the business scenario, now the items has been received, inspected and put in cross dock area. Now, buyer/warehouse planner will cross dock the item using cross dock functionality available in purchase order form Retail action tab.

Below section will explain the cross docking process in AX which will create an automatic transfer order in AX

Creation of transfer order via purchase order this will be done in AX

Keeping in mind, the business scenario, with respect to the same the purchase order, buyer will team or warehouse team will cross dock the received consignment and create the transfer order to complete the picking process using HHT device

Buyer/warehouse admin will click on retail action tab and click on cross dock tab

3.1

Buyer will select the cross dock warehouse and enter quantities and click on calculate quantities

3.2

Once the user click on calculate quantities, the cross docking quantity filed will get updated. After that user will click on create order button in cross docking form

3.3


Transfer order picking process using HHT

User will login in AX and go to inventory management module and select the cross docking transfer order

4.1

Transfer order lines will be automatically reserves. Warehouse user will click on release to warehouse and an infolog will be displayed

4.2


Warehouse user will click close the infolog and click on work detail button of selected transfer order and created open work will be displayed

4.3


Warehouse admin will follow the navigation in HHT/WMDP:

Login in HHT

1.1


Click on display work and filter by transfer issue

4.4

Select the work id and click ok

4.5

As per the business, user will go to the system suggested location, scan the pallet and click ok

4.6

As per the business, user will go to the system suggested location, PUT the pallet. Also, this is the case of bulk picking as the pallet in this location suffices the full quantity.

User will ok and display work will display and again filter the work by work id

4.7.png

Select the work id and click ok. The QC area is customization as per the business for outbound. The customized screen will be incorporated once the solution feasibility is checked with technical

4.8

Once the picker click ok. Below screen will display

4.9.png

Once the user click ok. The display work form will be displayed with no work id of USMF-000335

5.png

Closed work in AX as per the transfer order no-000071 using HHT device

5.1.png


This is one type of cross docking which can be used with advanced warehouse management in AX 2012 R3.

Have a techy day!


Production Process using Advanced Warehouse Management in AX 2012 R3 CU12

Hello Folks;this blog will walk through the production order or kitting process inside the warehouse using advanced warehouse management features.

Following data is used for the process:
a. A001 โ€“ product
b. A002 โ€“ product
c. Kit 1 โ€“ product – BOM of A001 and A002

lets take a warehouse business scenario, a production order is required for kitting items inside the warehouse. This scenario will be explained in both business as well as in application terminology.

Warehouse admin will create the production order in AX and click on estimate button. A new dialog will displayed and user will click ok.1

As a production process user will click on release button, the standard info log will display and user will ok. And the work and wave is created in the AX.
1

As per the info log, work created in AX
3

Single PLU or Raw material picking process
โ€ข Raw material picking or single PLU picking will be done by HHT device
โ€ข Work id status will be displayed in AX

The work will be assigned to user in ax by warehouse admin by clicking on change user button
4

Once the work is assigned to the HHT user. Assigned user/picker will login into HHT by his credentials
5

warehouse user/picker click on login
6

warehouse picker will click on display work in HHT device. And filter the work by raw material picking and click on apply filter.7

User will see the work id and go to the start location. User will click on work id in HHT and scan the pallet in the location to pick the items.
8

Warehouse HHT user, will click ok and below screen will be displayed
9

Warehouse picker will scan the License plate or pallet to pick the items and below screen will be displayed
10

HHT user will scan the trolley LP or new pallet in which heโ€™s going to put items and the same will be reflected in target LP field in HHT device11

HHT User will click ok and next screen to pick another BOM item in the same trolley LP or new pallet will be displayed
12

once HHT user click ok. Final screen displaying the final put of all picked items will be displayed in screen
14

Once the user click ok. Display work screen will be displayed16

In AX, the work will be closed;
15

Back to the business scenario, all picked items are kept in assembly or kitting location, where the assembly of goods will take place. After some time, kitting of items is done and, now it has to be put in new pallet or license plate and needs to be moved in new location inside the warehouse.

Once the picking of raw material is done. Warehouse user will login in AX and go to production module and select the production order no. P000207 (for this scenario). He will perform this activity, when kitting of items has started to keep the track of kitting operation.
โ€ข User will click on start button for production order. A โ€œstartโ€ dialog box will be displayed
17

โ€ข User close the info log. And click on “report as finished” button in AX. The following dialog box will be displayed
18.png

โ€ข User will click on ok. Info log box will display
19

โ€ข User will click on close. In AX, in work detail form, the raw material picking work will be closed. A new work order type โ€œFinished goods put awayโ€ is created in system.
20

Report as finished and put-away process in HHT
โ€ข Kit product โ€œKit-01โ€ picking will be done by HHT device
โ€ข Work id status will be displayed in AX

Once the work is assigned to the HHT user. User will login into HHT by his credentials
5

User will click on display work. And filter the work by finished goods put away and click on apply filter
21

User will select the work id โ€œUSMF-000312โ€. And below screen in HHT will display.
22

User will ok. And below screen will display
23

Once the user click ok. Main screen of display work will be displayed. In AX, the work will be closed.
24

External Item Description: AX Supply Chain Functionality

Hi folks, today I am going to blog about one of the Supply chain management process which is widely used in many industries especially in distribution businesses like spare parts, FMCG goods, Pharmaceuticals and so on. You name it and AX will configure the business process as per the requirement.

Business scenario for distribution industries: As we know the distributor procures/purchase the goods from the vendor. These goods/products/items will be having different item information like item code/number, item text, prices and etc… The major concern for the distributor is that they want to maintain their own item code/number in system along with vendor code and, push it to their dealers/franchises in nutshell push their products to market. But, when a distributor is raising a purchase order against the vendor, the system should provide the vendor item code which is maintained in the vendor item master, the reason Vendor will not be maintaining the distributorโ€™s item code (doesnโ€™t make sense for the vendor). So, below are the steps to configure this business scenario in Microsoft Dynamics AX 2012 R3 at the distributor level.


Letโ€™s configure the AXAPTA for maintaining the External item information at distributor environment.

Start by selecting the product against which the item code (Vendor item code) needs to maintained. For that go to product information managementย  ร  Common ร  Released products form. Go to detailed form of the selected product. Under purchase action tab ร  Related information ร  External item description. Here item is โ€œbearingโ€

1

Click on External item description icon and a form will appear. Enter the desired information required as shown in below form. Here the external item number is โ€œSA45NMโ€ which is nothing but the item number for bearing which a vendor maintains. In the vendor relation line, enter the vendor account number against which the current item is getting procured. Save and close the form.

2

After this setup, verify the vendor account information for this setup against the item โ€œBearingโ€. You will see the same form as shown above. Go to Accounts payable or Procurement and Sourcing module ร  Common ร  Vendors ร  All Vendors

3

Click on โ€œExternal Item Descriptionโ€ icon and you will see the form with additional variant information if there is any. This is a standard form common for both product and product masters.

4

Close the form. This is all the mandatory setups which you will be needing to configure the system to store the external item code.

Whether this setup will work or not? How to test? Whatโ€™s the result? So, folks every setup verification is done through transaction level. The bottom line; if a distributor is creating a purchase order for bearing items, the external item description information should be available in purchase order form and also in reports.

Letโ€™s create a purchase order for item โ€œBearingโ€ against 104 vendor. Go to Accounts payable or Procurement and Sourcing module ร  Common ร  Purchase orders ร  all purchase order ร  Click on purchase order icon under new under purchase order action tab. Select the vendor โ€œ104โ€ and click on create. A purchase order form will be displayed and enter the item name โ€œBearingโ€ on purchase order line tab.

5

As you can see, at line level after selecting the vendor โ€œ104โ€ with same product โ€œBearingโ€ will display the external item number in general line details. Also, if you want to see the print preview of your purchase order, click on purchase order confirmation tab under journals and a form will be displayed and click on print/preview and select any copy to see the external item number in page preview.

Also, in procurement and sourcing have something called โ€œFormsโ€ under setup. In that under general as highlighted in below image; under item number you have 3 options โ€œOur, Your and, Bothโ€. Select any option and see the position of external item number in print preview form.

6

There are also additional informationโ€™s like description, text and so on. The user can have it as per the requirement. Hence, the cycle is complete.

I will be blogging on another topic of Supply chain management soon enough. Till then, enjoy reading!!!!!!!!!!

Transportation Management in AX 2012 R3 – Part II

Hi Readers, Hope the previous blog helped you in setup of Transportation Management System (TMS) in AX 2012 R3. Now in this blog of TMS, I will try to explain the inbound ย cycle of transportation management. Inbound scenarios is possible from Purchase order and Transfer orders, which in AX is Accounts payable. Also, outbound scenarios is possible only from Sales order.

Lets start with inbound process; scenario I – Single load line from purchase order.

In this scenario, I will buy one item from vendor and get it deliver through third party transporter ( who will deliver the goods from one place to another). In AX terminology, create a product with its physical dimensions (weight and volume).

product creation

While creating a product, go to fast tab – give values to physical dimensions in order to calculate the total weight. Also, another fast tab i.e. select the transportation management general check box which is available below manage inventory.

2nd pic

You need to do these setup in order to add products to loads, while creating the order. This setup is common against all the orders, no matter what scenario.

Next step is to create purchase order. while creating the purchase order you have to select delivery address to deliver goods. Images below will be displaying the flow of how purchase order is created with mandatory details and transferring purchase order to load planning workbench.

purchase order

As you can see, the same product has been selected to carry out the transactions. Also, in line details the delivery address has been mentioned. After all this steps, go to warehouse management action tab and select the load planning workbench of transportation management. Below image will be displaying the load planning workbench form in which following steps/actions have been highlighted. Start from the top, filter option is available in order to avoid time. Here direction is inbound because of the purchase order line. Also, you can select the hide shipped check box, in order to see the lines with the load status “OPEN”. Also, in the below form you can see the pick up and drop off address which is similar which we filled while creating the purchase order.

load planning workbench 1

Now, select the “To new load” in order to create the load lines. Also, with the help of this functionality you can select the quantities lesser than you have mentioned in purchase order line. Beautiful feature isn’t it ! You can see the next highlighted icons which will give the better picture from the information is flowing to where.

load planning workbench 1.1

As you can see from above image, the capacity of load is negative as you have not selected the load template. But you can transfer the load to the choice of your transport, it will only tell you the capacity of the transport which can carry the maximum load. That’s why we have provided the physical dimensions, while creating the product, Remember !

Next step, you can see in below image. Go to line details of load template id and you can see the setup which we talked in previous blog of TMS. ย In this you can define the capacity of transport on the basis of dimensions. Also, as you can see after selecting the load template id capacity figures becomes positive. Why? Because I have defined load template which is having an enough load capacity. For better understanding, changes have been highlighted.

load planning workbench 1.2

Now after selecting the load template id, you can see the load line details with load status “OPEN” in below image. Concept behind this is that, till now we have just selected the quantities to be loaded in transport and now we have to calculate the rate and route through which we can transport the goods from one place to another. As you can see in below image, go to rating and routing fast tab under loads and select the rate route workbench inorder to calculate the rate and assign that rate to the choice of route.

load planning workbench 1.3

As you can see the action results in below form. Automatically, the ” From & To” address will appear in rate route workbench form. As we discussed about the miscellaneous charges in previous blogs and about freight charges, you can see I have assign the freight, fuel, and toll charges to this rate and to every route. In order to calculate the rate click on rate shop and this will display all the available rates along with their shipping carrier. Again, “Rate” functionality will provide you only the cost effective rate to transport the goods.

rate route workbench 1

After selecting the rate shop, you will see multiple shipping carrier rates for transportation of goods. Here, we have selected the least rate which is provided by only shipping carrier_001 @ 8645 rate. Now, in order to assign this rate to route – select the “assign” fast tab under route results and click ok.

rate route workbench 1.1

After assigning the route with rate, assign icon will become disable. Now, go back to load planning workbench form. As you can see in below form, click on ship and receive and confirm the outbound shipment.

final inbound before status

After confirming the inbound shipment, the status will change to shipped. Which means, you have complete the inbound cycle of TMS AX 2012 R3!.

final status

Voila! This inbound cycle is complete.

I will try to post my next blog on Transportation management which will be talking about outbound shipment in AX 2012 R3. Till then, Have a Nice Time!

“hope this blog will add value to readers”

Transportation Management Setup in AX 2012 R3 – Part I

Hi Folks, this blog will guide you to the transportation management setups. Transportation management can be understood with the help of scenarios like inbound and outbound. Here inbound scenarios is from purchase order, transfer order (where load is moving inside the warehouse) and outbound scenarios can be possible only from sales order i.e. load is moving from your warehouse. In this blog, only setup of transportation module will be discussed.

There are setups like rate base, rate base type, rate master, accessorial assignment, constraints, shipping carrier and so on. In setups every setup is done in order to achieve the objective, which is here to find the cost effective rate to transport the load from one place to another.

The steps are as follows:

First step is to initialize the base engine, which will automatically build the necessary data to run the process smoothly.

Untitled

After this step, you can set up other necessary engines like mileage, rate, generic to define the miles between the pick up and drop off destinations. According to the business scenarios, you also need to set up mode of transport and the transportation methods like ocean, railways, or by air. This setup basically helps to build the load template in which you define the capacity of the load in say truck.

Now,terms of delivery is needed to define the charges to the load. Its the check box you have to select in order to add charges like freight charges. Similarly, you need to define the miscellaneous charges against your charge code. If it is sales order it should be against customer or for purchase order it should be against your vendor. Path to terms of delivery is; go to sales and marketing-under setup-distribution-terms of delivery.

delivery terms freight

After all the miscellaneous charges against the charge code. You have to define the mileage engine. you will already find some data which will be displaying the pick up and drop off information and according to that miles have been mentioned.

mileag engine

As per the defined distance, you can calculate the rate also, you can define your own pick up and drop off destinations. Also, you can calculate the rate on the basis of days with the help of transit time engine. Instead of miles, in transit time engine you will see the days.

Now, one of the most important part in transportation management is define the rate according to miles, days as per requirements. Which can be possible only through the rate master (combination of rate base and rate base type), addition to the rate master you have to define the break master which will be providing the necessary information in rate base form. Rate base form will help you to provide the rate information according to miles, which you have defined in break master form. Below images, will give you an idea.

break master for rate base

As you can see, according to mileage engine, I have defined the mileage with data type integer in break master form. In break master form, random values have been taken in order to define the rate in rate base form.

As I said, the information provided in the break master form, will help you to fill the rate based on miles. As you can see in below image, the rates as per miles have been filled. While creating the rate base you have to select the break master which will fetch the information from break master form and will display in rate base form.

Rate base

In the rate base form, you can have ” AddOnCharge” between destinations. Also, as per your client’s requirement you can assign a minimum charge to the route, no matter what distance load has moved.

rate master

Above step can be performed by following path: go to trax – setup – rating – rate master. After creating the rate base form, assign the rate base assignment in rate master form. Which is displayed above. With the help of this form, rate base can filled in order to make calculations.

What all this setup will do ? In AX, rate master form consolidate all the information which you have provided back-end in rate base form, break master form, add on charges, freight charges, mode of transportation and relatively other forms of AX.

After the rate master, shipping carrier can be defined to complete setup process shown below. In shipping carrier form, you can see the other options like constraints, accessorial assignments and so on. This is the final setup step to complete the cycle of transportation management in AX 2012 R3.

shipping acrrier

The setups like constraints are used to avoid the transportation of goods in particular carrier in order to avoid the risk, the goods like petrol. You can decide the choice of constraint action like warning message, error or it will not allow the transportation of goods. The next logical setup is accessorial assignments which is nothing but your other charges like fuel surcharge, toll charges and so on. You can decide the accessorial fee type as per your requirements as shown in below image. You have to select the shipping carrier, in which you have to apply this figures.

accessorial assignments

Voila, setup of transportation is almost done!

Next part of transportation will be post soon, in which the transportation cycle will be discussed along with functionalities. The next post will include the inbound and outbound scenarios of transportation management in AX 2012 R3. Till then, have a nice time!

Hello world!

The massive mobilization of techsavy individuals across India has been on the rise for their inclusion in the “Technically sound” category in the organization raises vital questions on their technical knowledge contributing to the business acumen.

For decades, bloggers and the media at large have avoided serious debate on what qualifies as good knowledge?ย  Simple, easy to read technical content? Or pages of data sounding very smart and difficult to comprehend?

This blog attempts to be a simple, step by step, understandable take on picking the right TMS for oneโ€™s business. Dynamics AX as an ERP system will the the technology base for the blog.

Read on and follow the blog for the latest updates on AX.

Happy blogging!